Sean Teufler07.14.17
In the last 10 years, technical innovations expanding flexographic print capability have provided the increasing sophistication required to meet end user demands for uniqueness and value add. Aniloxes remain at the heart of these opportunities with their own evolutions and by partnering with developing ink and plate capability to provide solutions for the printer. These complex solutions to make these different elements work together come in the form of recommendations for engravings on the part of the anilox supplier. Certainly, changes to aniloxes, inks and plates have made engraving recommendations more complex, so it is wise to understand methods for arriving at the correct engravings. These methods include scientific tools like the banded roll, historical data and measurement.
We are going to focus on the changes affecting process and combination printing, as well as important additions to the printer’s repertoire, expanded gamut and particle applications. The question then becomes how do we put all this great technology to use? In the passages below, we will explore what we knew before and what we have learned about engraving recommendations and the best paths for you to get a proper determination of the right engraving.
As stated in the opening paragraph, the print solution you seek is increasingly dependent on utilizing new anilox, ink and plate capability; making scientific testing an essential tool. When it comes to testing, you must first find out from the ink supplier if their system is already formulated for a particular volume specification. Same goes for plates, what did the plate supplier intend in the use of their product? You should communicate with them to find out. If they have that information, then you can narrow the focus. You can look within your anilox inventory to see if you already have the components you need. If you don’t have the aniloxes, or the ink company or plate supplier aren’t sure of the volume requirement, then you need to strongly consider a banded anilox for testing. A banded anilox is a series of different line screens and volumes across the face of the anilox for determination of the ideal combination of cell opening and volume. Cell opening is important, since you will also be looking to test print capability at this point. The anilox supplier will take the parameters from the ink supplier and plate supplier in mind, along with what you have for a goal with your print to design the layout. There are some criteria you must supply for a banded roll. The anilox supplier needs the web and print widths to accurately set the bands and the plate supplier needs to see the banded roll drawing to set the lanes. Ideally, the engravings most likely to succeed should be centered in the anilox face. It is also a good idea to include matching line screens and volumes on the ends, known as control bands, to confirm balance and transfer. It is then just a matter of getting the banded roll made, ink supplied and plates made for testing.
What has changed in the last 10 years that would make banded roll testing an even more essential tool to engraving recommendations? For aniloxes, it has been a matter of reaching higher volumes with the same linescreen, the ability to achieve higher linescreens that are consistent in surface and ink delivery. Inks continue to see their own evolution. Solvent inks are using very fine ink dispersions; which have increased color capability, coverage and strength in a thinner ink film. Where at one time you would be thinking a 2.6 BCM anilox volume for process strength, you now would only consider a 2.0-2.2 BCM for the same application. For water-based inks, ink stability has greatly improved, as well as the number of substrates where these inks could be substituted instead of solvent inks. UV inks are much more fluid and print better than they ever have, allowing for volumes just over one BCM and the potential to require anilox volumes that are lower still. Ink suppliers are also capable of delivering the same inks at different strengths, which opens your creativity window in substrate use to improve coverage and counter substrate absorption of the inks. Plate technology from all suppliers has made monumental leaps in plate surface characteristics, with newer ones being developed all the time. What are the impacts of these plate surface changes? All other things being equal (same ink, same anilox) an increase in solid ink density or color strength of up to 20-30% is possible, depending on the capability of the technology utilized. These huge leaps in capability will force you to consider your starting point in volume. Depending on your goals, you may want to change your volume specification if you are not looking to achieve greater density. You may also decide that the greater density will improve your color gamut and you can refine your plate resolution. How do these plate surface changes all work? In general, texturing increases the plate surface print area, meaning the image itself can carry more ink in some cases and distribute it much better than traditional surfaces. Keenly placed microdots at angles, spacing and size create interference with the anilox, allowing for ink to be distributed much more evenly. On other plates, refined deliberate structures literally become an anilox surface of their own. Now that the plate surface has its own demand for ink, it is critical to pick engraving volumes that do not starve out the structures. It is important to emphasize again, these fantastic changes to aniloxes, inks and plates must be accounted for or you may get results you are not prepared to print. Even though the creative window has opened, your ultimate goal is to dial these new print capabilities in to a consistent print result your customers want. You must test.
Recommendations for Combo, Process, Expanded Gamut
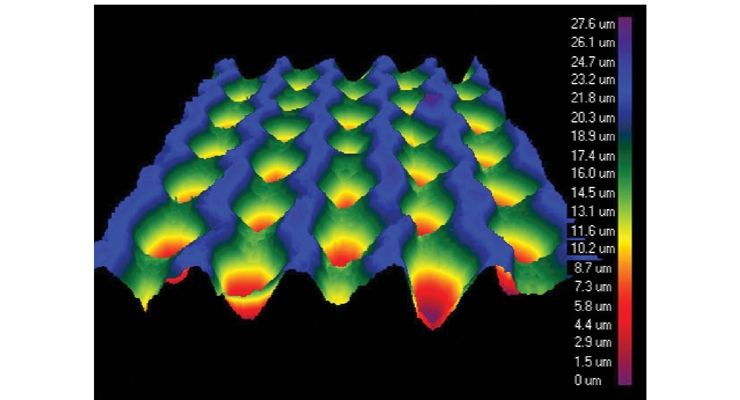
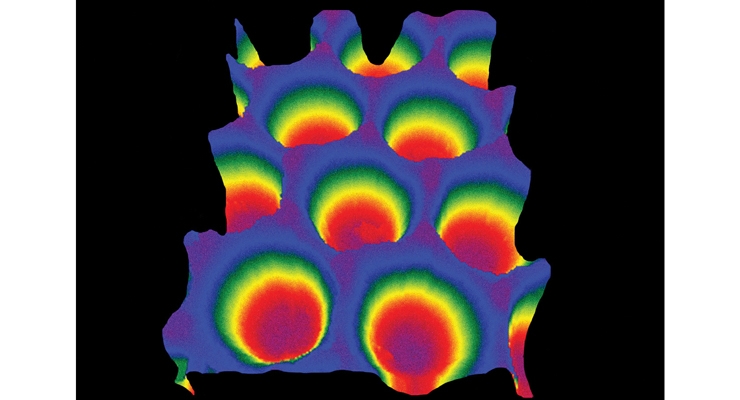
There has been some shifting in what would be considered “traditional” engraving recommendations due to improved laser technology, increased utilization of finer ink grinds and refined printing capability of the plate surfaces. The results are an evolution in engraving recommendations. You can now use the same anilox for both line and combination; whereas before, you would have to compromise either on ink strength for printing capability or sacrifice fine print in order to achieve color. You may have even had to separate the screen from the solid and run in two separate print decks with different anilox configurations. Those compromises are a thing of the past if the new technologies are utilized properly. When at one time you would be using a 600 line 3.5 BCM 60 degree, you can now switch to a higher line such as an 800 line and even lower the volume to take advantage of the improved ink strength. What hasn’t changed is the relationship between the cell opening and the size of the plate dot, as shown in the chart. You always want the minimum dot to be as large or larger than the cell opening when possible. Flat top dots and enhanced plate surfaces to a degree have dampened these concerns of overinking due to the broader window they provide in ink transfer, but it is still a good rule of thumb to avoid complications and print inconsistency. In terms of cell geometries, closed cells are still preferred for dot support. Closed cells that are smaller than the plate dots ensure the plate dots are not microflooded due to the random placement of the plate dot in relationship to the opening of the cell when printing. Expanded Gamut is a complex mix of both combination and process work and has specific anilox requirements. You will be utilizing anywhere from 5-7 inks to create all the required colors for the job. Print consistency and color correctness are even more critical than in traditional processes. The printing process must be completely stable to maintain color. Dirty plates, changes in ink transfer, drying-in of the inks in the anilox and registration issues are to be completely avoided. EG ink systems are customized by the ink supplier and should have target volume for achieving Delta E value and hue angle. Ask how the ink supplier determined their specification – did they use the same plate and tape combination? Test with your existing anilox configuration if you are very close to duplicating their process. If you don’t get the results you need, or if you would rather set your own DE targets, it is advised to test with a banded anilox. Engraving specifications for Cyan, Magenta, Yellow, Black, Green, Orange and Violet can be the same, but it really depends on the ink system. Sometimes more volume is needed to achieve required DE on the Green, Orange and Violet. For UV inks, you may see 1200 l/s 1.8 BCM for the process set and 900 2.2 for the OGV. For solvent inks, it is typical to see 1000 l/s 1.8 BCM for the process and 900 l/s 2.5 BCM for the OGV. How the ink sets were developed is a discussion to have with the ink supplier before you start testing.
Particle Inks
Particle inks like glitter, pearlescent, and metallic are dictated first by particle size and shape, then by the vehicle/varnish that is supposed to carry them to their destination on the web. The engraving specification is based on the particle distribution, with particular emphasis on the maximum size and highest percentage size. The highest percentage size is the workhorse for you and will be most noticeable in the print. You want all of the particles to transfer through the anilox/blade area if possible. If the engraving is too small (shallow) for the particles, the anilox/blade combination will work to mechanically separate/exclude the larger particles and the larger particles will work to prematurely wear the engraving. What you will see as a print result is a diminishing return in the transferred particles and an ever-increasing concentration of particles in the remaining circulating ink. Recommendation for particle inks should always include utilization of channel/open engravings to minimize wear and to accommodate agglomeration of the particles. Channels will help separate these larger clusters to a degree with much less damage done to the anilox cells. Particle ink recommendations can be tricky and must be done with solid technical data, often found on a TDS or Technical Data Sheet, where you can source the size of the particles in a distribution. The vehicle selection is also very important for yield. Common extender varnishes aren’t designed to carry these particles in suspension and the results are readily apparent as the particles settle to the bottom, even with aggressive agitation of the ink. Contact your ink supplier to find a blending varnish that complements these particles and assists in distribution through the anilox/blade area and to the plate transfer process. If the particles settle out like sand in water, you won’t achieve the effect regardless of engraving. For UV inks, the vehicle is often a version of a tactile varnish. Particle inks require agitation, even when using the best blending varnish. A combination of pumps works best. Consider using a peristaltic pump for transfer and an impeller pump or blender to keep the mixture together.
For example, a glitter operates best in an open cell like a 30 degree channel or a trihelical. Operating without a blade may be the best option if you can nip the anilox surface with a meter roll. Glitter particles are typically identified in what can be a confusing fashion (4x4, 6x6, 8x8), so it is important to do the homework and find out the true size in the unit of measure you are familiar with and is relatable to the anilox cell. This almost always should be the micron. Below are examples of glitter designations and the math to convert to a micron unit:
4x4: 1/256", is 0.0039062" or 99.21748 microns, typically a 100 x 100 micron particle (possible in metered flexo, typically 40 BCM to accommodate particle size)
6x6: 1/128", is a 0.0078125" or 198.4375 microns, typically a 200 x 200 micron particle (beyond metered flexo)
8x8: 1/96", is a 0.0104166" or 264.58164 microns, typically a 250 x 250 micron particle (beyond metered flexo)
Keep in mind that “beyond metered flexo” means a blade will not be advisable, but can still be printed flexographically without a blade if you have a print deck set up for just such an occasion.
Matte varnishes are another example of a particle ink. These varnishes tend to have specific volume requirements from the ink suppliers, as too low of a volume dampens the transfer and too much volume will overwhelm the matte effect and gloss over.
Anilox, ink and plate technology changes have made flexographic printing continue to be a viable method for meeting today’s printing demands. These additions to the print toolbox have pushed many anilox volumes away from traditional values; especially in the fields of process, combo and expanded gamut. Be mindful of what you want to do with these changes, so the end result is the desired result in color strength and stable printability. The banded anilox is a key testing apparatus developed with the anilox supplier’s expertise, and it remains the best scientific method to look at these ink improvements, plate enhancements, new anilox technology, sophistication in cell opening and volume capability. For complicated structures like particle inks, the particles themselves dictate the engraving depth and opening and how the plate transfer will affect the desired result. If you are building your own particle inks, the engraving alone will not guarantee success. How you set up, circulate and accommodate particles all play important roles in the success or failure of the transfer process. Whatever the application, a step-by-step approach yields the best results. Ultimately questions of what engraving you can use to meet print requirements are resolved through communication with the anilox, ink and plate suppliers, by testing existing anilox inventory and by banded anilox trials. Print with the understanding you are looking to create a printable, running solution; not just something that works for five minutes of press run time or a few thousand feet of material. It is easy to print; it isn’t easy to print consistently; but a scientific approach to engraving selection will net the best results.
About the author: Sean Teufler is the Technical Director for Harper Corporation of America. He has been in the printing industry since 1991 and has vast experience as an ink technician, technical service/sales/management for Harper and consulting on ink cost savings. Sean is a 7-time winner of Harper’s “Technical Rep of the Year” award and is a certified FIRST Level III Implementation Specialist.
We are going to focus on the changes affecting process and combination printing, as well as important additions to the printer’s repertoire, expanded gamut and particle applications. The question then becomes how do we put all this great technology to use? In the passages below, we will explore what we knew before and what we have learned about engraving recommendations and the best paths for you to get a proper determination of the right engraving.
As stated in the opening paragraph, the print solution you seek is increasingly dependent on utilizing new anilox, ink and plate capability; making scientific testing an essential tool. When it comes to testing, you must first find out from the ink supplier if their system is already formulated for a particular volume specification. Same goes for plates, what did the plate supplier intend in the use of their product? You should communicate with them to find out. If they have that information, then you can narrow the focus. You can look within your anilox inventory to see if you already have the components you need. If you don’t have the aniloxes, or the ink company or plate supplier aren’t sure of the volume requirement, then you need to strongly consider a banded anilox for testing. A banded anilox is a series of different line screens and volumes across the face of the anilox for determination of the ideal combination of cell opening and volume. Cell opening is important, since you will also be looking to test print capability at this point. The anilox supplier will take the parameters from the ink supplier and plate supplier in mind, along with what you have for a goal with your print to design the layout. There are some criteria you must supply for a banded roll. The anilox supplier needs the web and print widths to accurately set the bands and the plate supplier needs to see the banded roll drawing to set the lanes. Ideally, the engravings most likely to succeed should be centered in the anilox face. It is also a good idea to include matching line screens and volumes on the ends, known as control bands, to confirm balance and transfer. It is then just a matter of getting the banded roll made, ink supplied and plates made for testing.
What has changed in the last 10 years that would make banded roll testing an even more essential tool to engraving recommendations? For aniloxes, it has been a matter of reaching higher volumes with the same linescreen, the ability to achieve higher linescreens that are consistent in surface and ink delivery. Inks continue to see their own evolution. Solvent inks are using very fine ink dispersions; which have increased color capability, coverage and strength in a thinner ink film. Where at one time you would be thinking a 2.6 BCM anilox volume for process strength, you now would only consider a 2.0-2.2 BCM for the same application. For water-based inks, ink stability has greatly improved, as well as the number of substrates where these inks could be substituted instead of solvent inks. UV inks are much more fluid and print better than they ever have, allowing for volumes just over one BCM and the potential to require anilox volumes that are lower still. Ink suppliers are also capable of delivering the same inks at different strengths, which opens your creativity window in substrate use to improve coverage and counter substrate absorption of the inks. Plate technology from all suppliers has made monumental leaps in plate surface characteristics, with newer ones being developed all the time. What are the impacts of these plate surface changes? All other things being equal (same ink, same anilox) an increase in solid ink density or color strength of up to 20-30% is possible, depending on the capability of the technology utilized. These huge leaps in capability will force you to consider your starting point in volume. Depending on your goals, you may want to change your volume specification if you are not looking to achieve greater density. You may also decide that the greater density will improve your color gamut and you can refine your plate resolution. How do these plate surface changes all work? In general, texturing increases the plate surface print area, meaning the image itself can carry more ink in some cases and distribute it much better than traditional surfaces. Keenly placed microdots at angles, spacing and size create interference with the anilox, allowing for ink to be distributed much more evenly. On other plates, refined deliberate structures literally become an anilox surface of their own. Now that the plate surface has its own demand for ink, it is critical to pick engraving volumes that do not starve out the structures. It is important to emphasize again, these fantastic changes to aniloxes, inks and plates must be accounted for or you may get results you are not prepared to print. Even though the creative window has opened, your ultimate goal is to dial these new print capabilities in to a consistent print result your customers want. You must test.
Recommendations for Combo, Process, Expanded Gamut
There has been some shifting in what would be considered “traditional” engraving recommendations due to improved laser technology, increased utilization of finer ink grinds and refined printing capability of the plate surfaces. The results are an evolution in engraving recommendations. You can now use the same anilox for both line and combination; whereas before, you would have to compromise either on ink strength for printing capability or sacrifice fine print in order to achieve color. You may have even had to separate the screen from the solid and run in two separate print decks with different anilox configurations. Those compromises are a thing of the past if the new technologies are utilized properly. When at one time you would be using a 600 line 3.5 BCM 60 degree, you can now switch to a higher line such as an 800 line and even lower the volume to take advantage of the improved ink strength. What hasn’t changed is the relationship between the cell opening and the size of the plate dot, as shown in the chart. You always want the minimum dot to be as large or larger than the cell opening when possible. Flat top dots and enhanced plate surfaces to a degree have dampened these concerns of overinking due to the broader window they provide in ink transfer, but it is still a good rule of thumb to avoid complications and print inconsistency. In terms of cell geometries, closed cells are still preferred for dot support. Closed cells that are smaller than the plate dots ensure the plate dots are not microflooded due to the random placement of the plate dot in relationship to the opening of the cell when printing. Expanded Gamut is a complex mix of both combination and process work and has specific anilox requirements. You will be utilizing anywhere from 5-7 inks to create all the required colors for the job. Print consistency and color correctness are even more critical than in traditional processes. The printing process must be completely stable to maintain color. Dirty plates, changes in ink transfer, drying-in of the inks in the anilox and registration issues are to be completely avoided. EG ink systems are customized by the ink supplier and should have target volume for achieving Delta E value and hue angle. Ask how the ink supplier determined their specification – did they use the same plate and tape combination? Test with your existing anilox configuration if you are very close to duplicating their process. If you don’t get the results you need, or if you would rather set your own DE targets, it is advised to test with a banded anilox. Engraving specifications for Cyan, Magenta, Yellow, Black, Green, Orange and Violet can be the same, but it really depends on the ink system. Sometimes more volume is needed to achieve required DE on the Green, Orange and Violet. For UV inks, you may see 1200 l/s 1.8 BCM for the process set and 900 2.2 for the OGV. For solvent inks, it is typical to see 1000 l/s 1.8 BCM for the process and 900 l/s 2.5 BCM for the OGV. How the ink sets were developed is a discussion to have with the ink supplier before you start testing.
Particle Inks
Particle inks like glitter, pearlescent, and metallic are dictated first by particle size and shape, then by the vehicle/varnish that is supposed to carry them to their destination on the web. The engraving specification is based on the particle distribution, with particular emphasis on the maximum size and highest percentage size. The highest percentage size is the workhorse for you and will be most noticeable in the print. You want all of the particles to transfer through the anilox/blade area if possible. If the engraving is too small (shallow) for the particles, the anilox/blade combination will work to mechanically separate/exclude the larger particles and the larger particles will work to prematurely wear the engraving. What you will see as a print result is a diminishing return in the transferred particles and an ever-increasing concentration of particles in the remaining circulating ink. Recommendation for particle inks should always include utilization of channel/open engravings to minimize wear and to accommodate agglomeration of the particles. Channels will help separate these larger clusters to a degree with much less damage done to the anilox cells. Particle ink recommendations can be tricky and must be done with solid technical data, often found on a TDS or Technical Data Sheet, where you can source the size of the particles in a distribution. The vehicle selection is also very important for yield. Common extender varnishes aren’t designed to carry these particles in suspension and the results are readily apparent as the particles settle to the bottom, even with aggressive agitation of the ink. Contact your ink supplier to find a blending varnish that complements these particles and assists in distribution through the anilox/blade area and to the plate transfer process. If the particles settle out like sand in water, you won’t achieve the effect regardless of engraving. For UV inks, the vehicle is often a version of a tactile varnish. Particle inks require agitation, even when using the best blending varnish. A combination of pumps works best. Consider using a peristaltic pump for transfer and an impeller pump or blender to keep the mixture together.
For example, a glitter operates best in an open cell like a 30 degree channel or a trihelical. Operating without a blade may be the best option if you can nip the anilox surface with a meter roll. Glitter particles are typically identified in what can be a confusing fashion (4x4, 6x6, 8x8), so it is important to do the homework and find out the true size in the unit of measure you are familiar with and is relatable to the anilox cell. This almost always should be the micron. Below are examples of glitter designations and the math to convert to a micron unit:
4x4: 1/256", is 0.0039062" or 99.21748 microns, typically a 100 x 100 micron particle (possible in metered flexo, typically 40 BCM to accommodate particle size)
6x6: 1/128", is a 0.0078125" or 198.4375 microns, typically a 200 x 200 micron particle (beyond metered flexo)
8x8: 1/96", is a 0.0104166" or 264.58164 microns, typically a 250 x 250 micron particle (beyond metered flexo)
Keep in mind that “beyond metered flexo” means a blade will not be advisable, but can still be printed flexographically without a blade if you have a print deck set up for just such an occasion.
Matte varnishes are another example of a particle ink. These varnishes tend to have specific volume requirements from the ink suppliers, as too low of a volume dampens the transfer and too much volume will overwhelm the matte effect and gloss over.
Anilox, ink and plate technology changes have made flexographic printing continue to be a viable method for meeting today’s printing demands. These additions to the print toolbox have pushed many anilox volumes away from traditional values; especially in the fields of process, combo and expanded gamut. Be mindful of what you want to do with these changes, so the end result is the desired result in color strength and stable printability. The banded anilox is a key testing apparatus developed with the anilox supplier’s expertise, and it remains the best scientific method to look at these ink improvements, plate enhancements, new anilox technology, sophistication in cell opening and volume capability. For complicated structures like particle inks, the particles themselves dictate the engraving depth and opening and how the plate transfer will affect the desired result. If you are building your own particle inks, the engraving alone will not guarantee success. How you set up, circulate and accommodate particles all play important roles in the success or failure of the transfer process. Whatever the application, a step-by-step approach yields the best results. Ultimately questions of what engraving you can use to meet print requirements are resolved through communication with the anilox, ink and plate suppliers, by testing existing anilox inventory and by banded anilox trials. Print with the understanding you are looking to create a printable, running solution; not just something that works for five minutes of press run time or a few thousand feet of material. It is easy to print; it isn’t easy to print consistently; but a scientific approach to engraving selection will net the best results.
About the author: Sean Teufler is the Technical Director for Harper Corporation of America. He has been in the printing industry since 1991 and has vast experience as an ink technician, technical service/sales/management for Harper and consulting on ink cost savings. Sean is a 7-time winner of Harper’s “Technical Rep of the Year” award and is a certified FIRST Level III Implementation Specialist.